There will be a four week YouTube “Happy July Giveaway” with a summer, travel theme. Participants can enter to win the printable kit from the Multimedia Crafts Digital Esty shop called, “Vintage Summer Road Trip.” Winners will get the kit, some craft supplies, along with a project that is created each week on the YouTube channel: Sonya Stover.
“A Vintage Summer Road Trip” by Sonya Stover Etsy shop Multimedia Crafts Digital
Each video will air on the first Monday of each week at 6:00 am EST. The title of the videos will be numbered.
Week 1 YouTube icon
Week 2 YouTube icon
Week 3 YouTube icon
Week 4 YouTube icon
You will have 5 days to view and participate in the giveaway.
Drawings will be held on Saturday morning at 6:00 am EST by way of an electronic random picker.
Once the winner is chosen on YouTube, they have one week from the day of the drawing to respond. If there is no response within that time frame another winner will be chosen.
The Crafty Trinity with three digital journal kits
Come and get these three digital journaling kits from the “Crafty Trinity”, a group of three ladies, including myself, Sonya Stover, the fabulous Pham from “Livie’s Lovelies” and Thelisha from “The Sweets by Thelisha”. We have each developed a summer, travel themed journal kit titled, “Vintage Summer Road Trip”.
Each kit is located in our shops. To access them simply click on the kit photos below.
“A Vintage Summer Road Trip” by Sonya Stover Etsy shop Multimedia Crafts Digital
“A Vintage Summer Road Trip” by Pham of Livie’s Lovelies etsy shop
A Vintage Summer Road Trip by Thelisha Shop at “The Sweets by Thelisha”
Preserve your fun memories using papers, envelopes, elements, and more. Use them to create journaling spaces, tuck spots, pockets, and more to house your photos and memorabilia.
This slideshow requires JavaScript.
Watch on YouTube each of us as we go into more detail of what the kits include and what we made from it. Also check out our other social media sites.
Don’t you just get so excited when you buy something and get a bonus gift…the packaging? I recently got a new pair of sandals and I was stoked with the plastics and tissue papers that came with it. I immediately thought of making some journal pockets, doing some decoupage, and simply getting creative with all the boxed content.
I love to recycle things and add them to my crafts. That is exactly what I did.
The scrapbook papers I used in this project were from multiple digital sources. The first one was from the Multimedia Crafts Digital Etsy shop called, “Book of Plays Journal Pages kit.” The other ones were from two different FREEBIE kits from the Multimedia Crafts Digital Facebook page called, “At the Opera“, and “Eerie Tales“, and the last one was from the Multimedia Crafts Digital blog here called, “Journal Notebook Pages“.
Watch the entire process from the video below.
This project turned out to be very fun. The pocket turned into a mini policy envelope with a wrap-around-ribbon closure. I added some tags, stamped papers, vintage library cards, vintage ledger paper and more. I accented the envelope on the inside with a fussy cut out tuck spot.
Finished project outside
inside flap
steampunk tags
steampunk glasses folder
plastic pocket
inside of envelope
I made sure that all the edges of each paper included with the envelope were distressed with Tim Holtz Walnut Stain Distress oxide ink. I finally added a file folder made with the various scrapbook papers mentioned from the digital kits above. I did some stamping using various Tim Holtz stamps. I also included two altered playing cards I purchased from, “The Sweets by Thelisha“.
Using the recycled plastic to make the four pockets inside the policy envelope turned out just as I originally envisioned it. So when you buy new things, learn to think outside or even inside “the box” if you need to. You never know what treasure you can turn your trash into.
Enjoy this printable freebie envelope. It has a spring, shabby chic theme to it. It is great for scrapbooks, junk journals, mother’s day themed projects and more. This envelope is high quality 300 dpi and is saved in both jpg and pdf format. Assembly instructions are included with the download.
Here is my contribution to the April 2021 Spring Pixel Scrapper blog train. This kit comes with twelve papers. Six of them are 12″ x 12″ and the other six are 8.5″ x 11″ and are ready for printing. Both can be used in digital projects as seen in both figures 1 and 2 below. This kit also comes with 14 elements with soft blues, greens, yellows, and grays. The papers are all in jpg format. The elements are in png format with a sheet of printable graphics that is in jpg. All items in kit are high quality 300 dpi. To access this kit click here.
The theme for the kit was beachy, spring, garden, rainy days, and lemons. Below is the color palette. To see other kits from fellow Pixel Scrapper blog train collaborators click here.
April 2021 Blog train color palette
This is the color palette.
figure 1. Splish Splash digital layout using the Pixel Scrapper April 2021 Blog Train kit
I used multiple elements from the Pixel Scrapper April 2021 Blog train kit in these two digital illustrations. I simply used Adobe Photoshop on my laptop to edit my layouts. Making digital scrapbook pages is a great way to store family pictures without taking up too much physical space. However, if you prefer hanging your images on your walls or or putting them in an album you can keep your beautiful photos and keepsakes by having them printed out.
figure 2. A Beautiful Spring Day
In this next layout I combined multiple shapes of circles and rectangles along with graphics from the kit to finish off the “Beautiful Spring Day” at the Beach.
Journal envelope and ephemera made using the Pixel Scrapper April 2021 Blog Train kit
I made this spring journal piece by printing out one of the 8.5″ x 11″ papers twice; One scrapbook paper on cardstock and the elements sheet on vellum. You can use an inkjet or laser printer on the vellum.
iced lemon ade made using glossy accents and vellum over cardstock.
I layered multiple elements of the same kind together, gluing the vellum overtop the cardstock images. I added glossy accents to some to give them more of a 3-D ice cube effect.
Disclaimer: Should you make a purchase from clicking on some of the links above I will receive a monetary percentage of the cost of your item(s). Thanks for stopping by and happy crafting!
Spring Ephemera made from Multimedia Digital Crafts Freebie kits and other mixed media
I love to make journals and all sorts of scrapbooking elements to fill my books and folios. Today I decided to construct some out of various mediums including digital printables, die cut shapes, washi tape, and more.
Fresh Air Papers Kit
I began by printing out the Multimedia Crafts Digital FREEBIE kit called, “Fresh Air”. Using one of the Multimedia Craft Digital Etsy kits called, “2” x 3” Card and Envelope Template” I printed the card image over top of one of the digital freebie papers.
Printed out papers from “Fresh Air” digital Freebie kit and Multimedia crafts digital etsy kit called, “2” x 3″ Card and Envelope Template
This is the back of the unassembled envelope where two butterfly pieces were die cut out of the paper
Before assembling the envelope, I took two butterfly dies from the Tim Holtz stamp and die set, “French Flight”, placed them on the back of the envelope and die cut out those shapes, keeping the pieces to use later in this project.
acetate stitched to back of envelope template
I then cut a piece of acetate to fit the size of the back of the envelope and stitched the two together.
assembled envelopes garnished with distress ink and die cut shapes
Once sewn, I distressed the edges using Tim Holtz Distress Oxide ink, “Vintage Photo,” and assembled the envelope according to the provided instructions that came with the card and envelope template. You can also watch the YouTube process video of assembling that template if needed.
Completed 2″ x 3″ card and envelope
To dress up both the card and envelope, I added some torn sudoku paper and some die cut elements from the Tim Holtz Ephemera Pack Field Notes. I also added a flower to the envelope to complete the look.
The next elements I made were 2 ½ inch circles I punched out from the purple and white striped paper. I lightly glued them to some muslin and stitched around the edges. (Go easy on me because I’m still working on my sewing skills).
I then created some envelopes from the pink and blue checkered paper. I folded them into the shape of the envelope, partially glued them together using washi tape, and sealed the envelope by stitching around the edges. I garnished them with the leftover butterfly die cut pieces from the first envelope and added some rub on transfer text to each.
For the last piece of ephemera, I made a tag. I took some of the scraps from the previous projects and created a collage. I stitched on and around the tag. I finalized it with an eyelet and some white mini rose trim.
Fresh Air 3″ Circles Kit
I hope that this project was helpful and that you enjoy using some of the freebies from this blog. You can also check out the latest FREEBIE kit called, “Fresh Air 3 inch Circles”. To access it click here.
Thanks for visiting and as always:
Happy Crafting!
Disclaimer:
Should you make a purchase from some of the above links I will receive a monetary percentage of the price of your item(s). Thanks.
Enjoy this latest FREEBIE digital papers kit called, “Fresh Air”. Explore your creativity by making all sorts of things like cards, tags, scrapbooks, junk journals and other mixed media projects. This bright colored kit comes with 6 papers, all printable onto 8.5″ x 11″ paper. The are all high quality 300 dpi and have been saved in jpeg format. To access the kit click here.
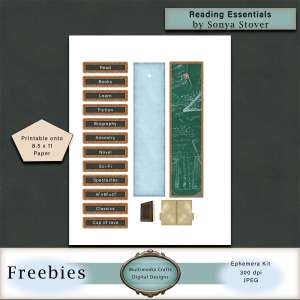
Welcome to a new month to create and have fun with various digital media. Here is this month’s first freebie kit called, “Reading Essentials”. This is a printable ephemera kit with a scholastic theme. Add it to a spring card, journal, scrapbook and more. To Access this kit click here.
Reading Essentials Ephemera Kit
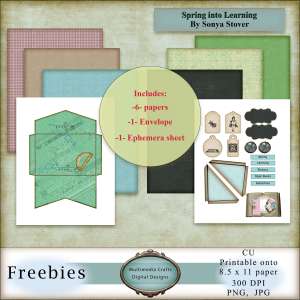
This kit would also look great with papers and embellishments from the free Multimedia Crafts digital facebook kit called, “Spring into Learning“. To access that kit, simply visit the facebook page, then Photo Albums, and choose this kit among other freebies to have. Click like, share, leave a comment and show your beautiful work.
Spring into Learning kit
Get some fun favorite supplies like art glitter glue, double sided score tape, mini magnets, and other things to help assemble your free printables. Embellish these with beautiful lace, jewelry, cabochons and other enhancing charms. Have fun with your art.
Thanks for stopping by. As always, happy crafting!
Disclaimer: Should you make a purchase from the link(s) above I will receive a monetary percentage of the cost of your purchase(s). Thanks.
Do you love so many things in scrapbooking that you are often times overwhelmed with what to make, how to make it, what to use, and so forth? I have a hard time narrowing down how to create something as simple as a card, tag, layout, frame, and the list goes on. There are so many beautiful images, embellishments, and ideas floating around everywhere, and I love them all. One way to reduce the clutter of thoughts in your mind when you are drafting a project is to think about what you or the recipient love or will love the most about your soon to be creation.
If it is a card, what are the components that you must have? Do they have to coordinate in a certain manner? Do you have to use die cut shapes all the time? Do you want text and word art on it? Does it have to be shabby chic, vintage, steampunk, or any other preferred style? All of these are questions that should be answered before you begin your craft. These mysteries can be somewhat eliminated by using a plan or questionaire. Download the free “What I Love Scrapbook and Ephemera Checklist“. This is a list of suggestions to help solve your creative block.
If you know the theme you are using, find images, text, and shapes that compliment your design. Go on Pinterest and Google to find some images similar to what you would like to make. See what those creations are composed of. Take notes and incorporate those ideas into your next project.
I hope this small tip was helpful. Thanks for stopping by and happy crafting.
Adobe Photoshop is awesome in how it provides many editing tools that let you place subjects into various backgrounds. It is so much fun when you can create your own setting with added elements to change the look of an original photo. In this particular instance I used the “Pen” tool to remove a person from an image and transfer it into another, adding additional blending techniques to the final layout.
I started out opening up a new print, 12″ x 12″ file in Adobe Photoshop CC 2020. Under “Preset Details” I set the resolution to 300 pixels /inch, the “Color Mode” to RGB color 8 bit, “Background Contents” White, and Color Profile to, “Working RGB: sRGB IEC61966-2.1, with a Pixel aspect ratio set to “Square Pixels.”
Next I opened up the original file of the subject I wanted to crop out. I then selected the “pen” tool, located to the left on the toolbar. Using the anchor points and handle, I clicked and dragged around the image, creating a path around the person. Click here to learn more about editing paths in Adobe Photoshop.
Once the path was completed I clicked on the paths panel. At the bottom I selected the “load paths as a selection” tool.
I clicked on the “Select” menu, located at the top, and using the dropdown options I chose “Inverse”. This task highlighted the image with dots, or “marching ants”.
I deleted the highlighted, background portion of the photo, leaving only the selected subject remaining.
You will find that the subject remaining still has “marching ants” around it. You can simply use the keyboard shortcuts “control+ D” on a pc or “command +D” on a mac and it will get rid of the dots. You have now got yourself an image to save and use for later projects.
Create your own layout by adding the image into a different background. Find backgrounds and elements from various places such as Pixel Scrapper and etsy Have fun by adding different colors, embellishments, patterns, shapes, and blending them together with a plethora of options. When using Adobe Photoshop there are so many possibilities to edit and master your digital masterpieces. Explore your options and utilize the tools provided in that software.
I hope this tip was helpful. Thanks for visiting. Happy crafting!
Disclaimer: Should you click on one of the above links and make a purchase, I will receive a monetary percentage of the cost of your item(s). Thanks.
 There will be a four week YouTube “Happy July Giveaway” with a summer, travel theme. Participants can enter to win the printable kit from the Multimedia Crafts Digital Esty shop called, “Vintage Summer Road Trip.” Winners will get the kit, some craft supplies, along with a project that is created each week on the YouTube channel: Sonya Stover.


 The next elements I made were 2 ½ inch circles I punched out from the purple and white striped paper. I lightly glued them to some muslin and stitched around the edges. (Go easy on me because I’m still working on my sewing skills).
 I then created some envelopes from the pink and blue checkered paper. I folded them into the shape of the envelope, partially glued them together using washi tape, and sealed the envelope by stitching around the edges. I garnished them with the leftover butterfly die cut pieces from the first envelope and added some rub on transfer text to each.
 For the last piece of ephemera, I made a tag. I took some of the scraps from the previous projects and created a collage. I stitched on and around the tag. I finalized it with an eyelet and some white mini rose trim.


 I started out opening up a new print, 12″ x 12″ file in Adobe Photoshop CC 2020. Under “Preset Details” I set the resolution to 300 pixels /inch, the “Color Mode” to RGB color 8 bit, “Background Contents” White, and Color Profile to, “Working RGB: sRGB IEC61966-2.1, with a Pixel aspect ratio set to “Square Pixels.”


You must be logged in to post a comment.